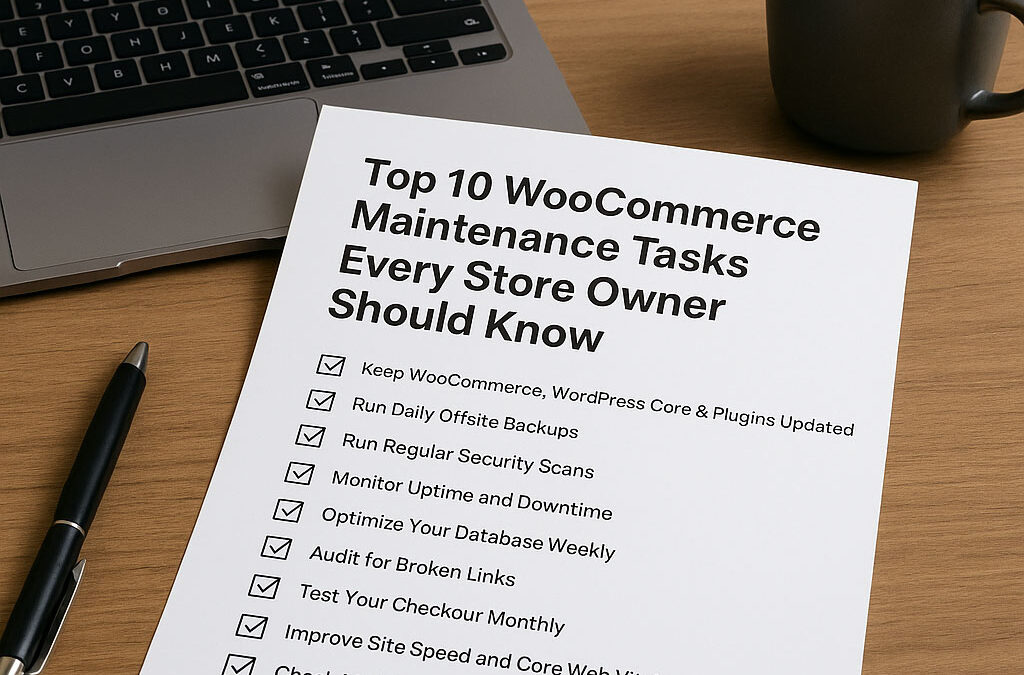
This one’s first for a reason. Outdated software is the #1 cause of hacked WordPress sites. Updates aren’t just about new features—they often include security patches and bug fixes.
But here’s the catch: always update in a staging environment first. Updating directly on your live site without testing can break your theme, plugins, or even your checkout.
A staging environment is a private copy of your live website where you can safely test changes—like plugin updates, theme tweaks, or new features—without affecting your actual site or users. It mirrors your real site’s setup, so you can catch and fix issues before pushing updates live. These are generally available with a few clicks on your hosting account's cPanel. Ask your hosting provider how to set one up on your server.
Quick tips:
Check for updates weekly.
Use tools like MainWP or ManageWP for safer, centralized updates.
Keep WooCommerce itself up to date, but always test major updates thoroughly first.
If your site goes down or gets hacked, backups are your safety net. Without them, you're flying blind—and the cost of downtime or lost data can be brutal.
Set up automated daily backups, and store them somewhere off-site (not on your server). That way, if something breaks, you can restore it quickly.
eCommerce sites are juicy targets for hackers. Unfortunately, WordPress and WooCommerce sites are particularly common targets due to their widespread popularity.
Running regular malware scans and security audits can prevent serious damage. Use a plugin like Wordfence or Sucuri to catch threats early and block brute-force login attempts.
Also:
Enable 2FA for all admin users
Use strong passwords (no "admin123")
Limit login attempts and hide the login URL
Hide your login page with a plugin
✅ Pro tip: Schedule a weekly security scan and check the logs. It only takes 5 minutes and could save you a fortune.
4. Monitor Uptime and Downtime
Every minute your site is down, you’re potentially losing money, especially during high-traffic periods or ad campaigns.
Uptime monitoring tools notify you the moment your site goes offline. This allows you to act quickly, before your customers even notice.
Tools that work well:
UptimeRobot
Jetpack Monitor
Pingdom (freemium)
Set it up once, and you’ll receive instant alerts by email or SMS if your site goes down.
5. Optimize Your Database Weekly
WooCommerce stores grow fast—and so does the clutter. Every product revision, cart abandonment, and spam comment bloats your database, slowing things down.
Regularly cleaning it helps improve performance and reduce server load.
Use plugins like:
WP-Optimize
Advanced Database Cleaner
WP-Sweep
Things to clean:
Post revisions
Expired transients
Spam comments
Abandoned cart data
6. Audit for Broken Links
Broken links aren’t just bad for SEO—they’re bad for user trust. If a customer clicks on a product and gets a 404, you’ve probably lost them.
Scan your site at least monthly using:
Broken Link Checker (plugin or online tool)
Ahrefs (if you already use it)
Screaming Frog
And when you remove a product or change a URL, always set up a 301 redirect.
7. Test Your Checkout Monthly
You might assume your checkout is working fine. But all it takes is a plugin update or API change from your payment gateway to cause issues—without you knowing.
Create a routine to test:
Add to cart
Coupon codes
Shipping rate calculations
Stripe or PayPal checkout
Order confirmation emails
Also test on mobile. Small bugs on mobile devices can kill conversion rates.
8. Improve Site Speed and Core Web Vitals
Speed = revenue. If your store is slow, people bounce—and search engines take notice.
Run regular speed tests using:
GTmetrix
Google PageSpeed Insights
Pingdom
Some speed tips:
Compress and convert images to WebP
Enable caching (WP Rocket is great)
Remove unused plugins
Use a CDN (like Cloudflare)
Fast-loading stores not only rank better but also convert more visitors into buyers.
9. Check Mobile Responsiveness
Over 60% of eCommerce traffic comes from mobile devices. That means your store needs to work perfectly on smartphones and tablets.
Test across:
iPhones and Androids
Tablets
Multiple browsers (Safari, Chrome, Edge)
Look for:
Overlapping elements
Cut-off text or buttons
Image scaling issues
Tools like Chrome’s mobile inspector or BrowserStack make testing easy.
10. Review Logs and Scan for Plugin Conflicts
Sometimes your site breaks silently. The front end looks fine, but under the hood, there could be PHP errors, plugin conflicts, or server warnings.
Check:
WooCommerce logs (under WooCommerce > Status > Logs)
If this all sounds like a lot… it is. But it’s also what separates successful eCommerce sites from the rest.
That’s why we offer a hands-off eCommerce maintenance packages that handles all these tasks and more—so you can focus on growing your store, not fixing it.
Or check out our full range of eCommerce services if you need help with SEO, marketing, or site improvements.
It’s the same system we use for our clients—simple, effective, and easy to follow.
Final Thoughts
Maintaining your WooCommerce store isn’t optional—it’s essential.
These 10 tasks are what keep your store safe, fast, and ready to convert. Skipping them can lead to downtime, lost sales, and expensive fixes down the road.
If you’d rather have an expert handle this for you, check out our eCommerce maintenance packages or eCommerce services. We’ll keep your site in top shape while you focus on what you do best—running your business.
WooCommerce maintenance refers to the ongoing tasks that ensure your online store runs smoothly, securely, and efficiently. These tasks include:
Updating WordPress core, themes, and plugins
Monitoring uptime and performance
Running security scans and applying patches
Backing up your website regularly
Cleaning and optimizing your database
Checking for broken links or errors
Ensuring compatibility between WooCommerce and extensions
Unlike development or redesign work, maintenance focuses on the health, safety, and reliability of your store after it’s live.
The Real Cost of Neglecting Maintenance
Let’s get real—neglecting WooCommerce maintenance can hurt your business, often silently. It’s not always about a hacked site or total crash (though that can happen, too). It’s the slow-loading pages, incomplete checkouts, broken product pages, and SEO penalties that slowly erode your revenue and reputation.
Here’s what can go wrong when maintenance is ignored:
🔒 Security Vulnerabilities
Outdated plugins and themes are a hacker’s dream. According to Sucuri, 60% of WordPress infections stem from vulnerable plugins. One exploit could compromise customer data and your credibility.
🚫 Downtime and Site Crashes
Unmonitored plugin updates can break your checkout or crash your site entirely. Every minute of downtime can mean lost revenue, especially during peak seasons.
🐢 Poor Site Performance
A bloated or outdated site tends to slow down over time. Speed is crucial for conversions—Google reports that a 1-second delay in load time can result in a 20% reduction in conversions.
📉 Lower SEO Rankings
Google prioritizes secure, fast, and mobile-friendly websites. If your store doesn’t meet technical expectations, you may slip down the rankings, no matter how good your products are.
Core Maintenance Tasks Every Store Needs
Let’s take a look at the essentials every WooCommerce site should include in a maintenance plan:
✅ Regular Backups
Backups are your safety net. Set up automated daily backups stored off-site (not just on your server). In case of a failure, you can restore your store with minimal downtime.
✅ Plugin, Theme, and WooCommerce Updates
WooCommerce and its extensions are frequently updated for security and compatibility. Apply updates in a staging environment first to avoid surprises on your live site.
✅ Security Monitoring
Use tools like Wordfence, Sucuri, or iThemes Security to scan for malware, suspicious activity, and brute-force attacks.
✅ Uptime Monitoring
Services like UptimeRobot or Jetpack Monitor alert you instantly if your site goes down—so you can act before customers notice.
✅ Database Optimization
Over time, your database fills with unnecessary data like post revisions, spam comments, and expired transients. Regular cleaning improves performance.
✅ Broken Link Checks
Broken links frustrate users and hurt SEO. Use tools like Broken Link Checker or Ahrefs to catch and fix them.
✅ Speed and Performance Testing
Run speed audits using GTmetrix, PageSpeed Insights, or Pingdom to keep your store running fast—especially important for mobile shoppers.
How Maintenance Helps SEO and Sales
Here’s something many store owners overlook: site maintenance directly affects your SEO and sales performance.
Speed = Better Rankings – Google uses site speed as a ranking factor, particularly for mobile devices.
Uptime = More Conversions – If your store is down, you’re not just losing sales—you’re losing customer trust.
Security = Customer Confidence – HTTPS and a secure checkout flow build trust with shoppers, improving conversions.
Clean Structure = Easier Crawling – Maintaining proper schema, internal linking, and a clean site structure makes life easier for search engines.
DIY vs Professional WooCommerce Maintenance
Many store owners start out handling updates and backups themselves. That’s totally fine—until things get complicated. As your store grows, so do your risks.
DIY Maintenance
Professional Maintenance
Time-consuming
Time-saving
Risk of human error
Expert handling
Reactive (fix it when it breaks)
Proactive (prevent issues before they start)
No support if something breaks
Priority support and monitoring
If you’re not a developer, trying to fix a plugin conflict or security breach under pressure can be overwhelming. That’s where a professional WooCommerce maintenance service comes in.
How We Help: Our WooCommerce Maintenance Service
At Web Design Services, we offer tailored WooCommerce maintenance plans designed to keep your store secure, fast, and profitable—without the headaches.
We handle:
Safe plugin and theme updates
Daily off-site backups
Security scans and malware removal
24/7 uptime monitoring
Performance audits
Emergency support when you need it most
Whether you’re running a small store or managing thousands of products, our service is built to grow with you.
Your WooCommerce store is one of your most valuable business assets. Neglecting its maintenance is like letting your best sales rep sleep through work. A proactive maintenance plan protects your revenue, improves your WooCommerce SEO, and ensures a seamless shopping experience for your customers.
Don’t wait for a crash or security scare to take action. Let us keep your store in top shape, so you can focus on growing your business.
Google Business Profile is a free tool offered by Google that allows businesses to manage their online presence across Google Search and Maps. Verifying and editing your business information can help customers find your business and tell your story. But simply having a GBP isn’t enough. To truly benefit from organic traffic, you must focus on generating and sustaining organic visits.
Organic visits are particularly valuable because they indicate that users find your business naturally—without paid advertisements—which often leads to higher engagement and trust. Moreover, an optimized profile can boost your local search rankings, making it easier for potential customers in your area to discover you. The Google Business listings are ranked higher on the first page of Google for local searches, so they are essential if you rely on local customers or clients.
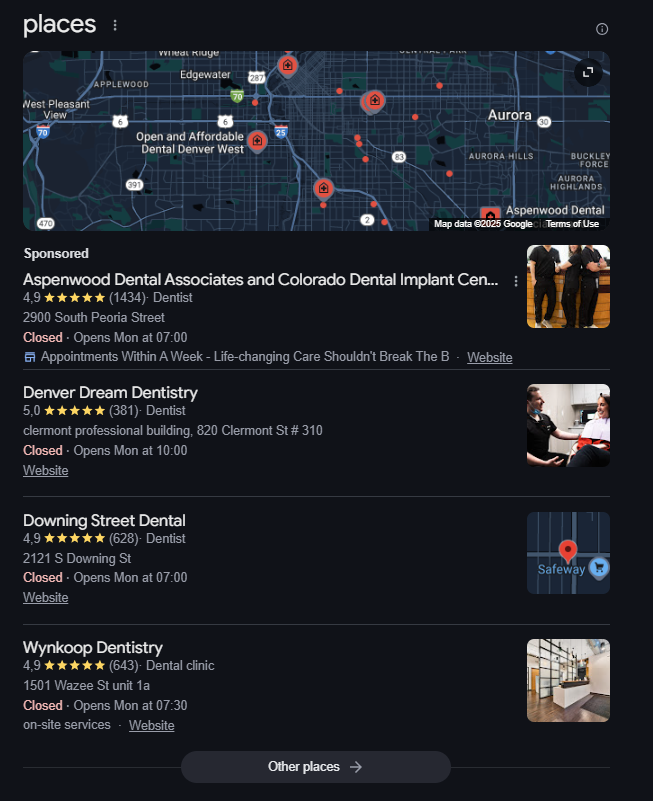
For example, if you are a dentist in Denver, Colorado, and someone searches for a dentist in your city, you want them to see your profile. To ensure this, you must optimize it carefully, as there are only a few listed on the first page. Here's a screenshot of an example of the Google Business profiles listed.
Notice in the example above that most top listings have 5-star reviews and a physical address to meet customers. A physical address, such as a clinic or shop, is helpful, but not required. For example, if you have a lawn maintenance business, you don't have to have a physical location, but you can select the towns you want to target instead.
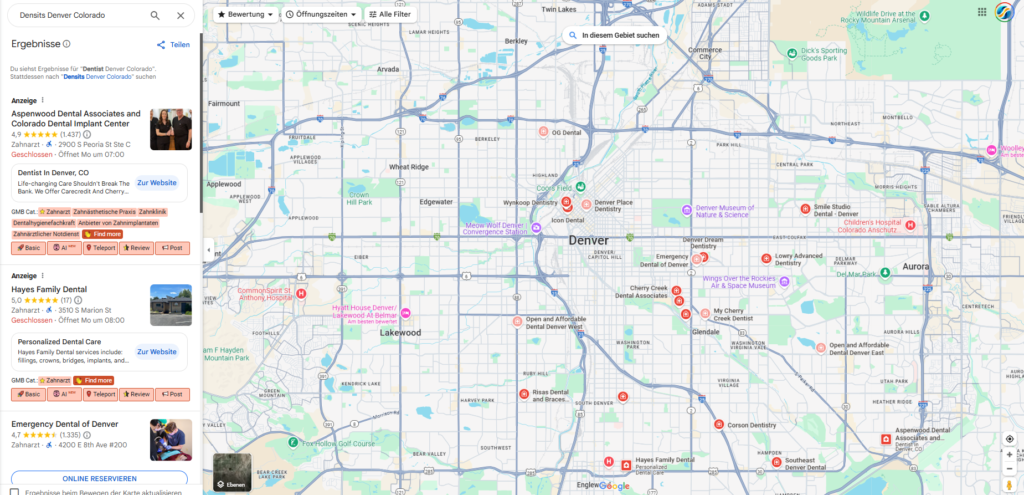
However, from what I've seen over the years, it certainly helps to be close to the city you are targeting. A good way to gauge this is to open Google Maps and look for your city. Then, look how close your business is to the city's name.
Google Maps Example
If you are right next to it, you have a better chance than someone far away. But you also need to build your Google reviews, keep your profile updated, and much more. Ensure your website is top-notch and focused on your city, with at least one page dedicated to your city.
This article will explore strategies to boost your organic visits, from initial setup and local SEO techniques to advanced optimization and common pitfalls to avoid. If you’re looking for a partner to help with your overall digital strategy, check out our Online Marketing and Local SEO Orlando services for tailored solutions.
Setting Up and Optimizing Your Google Business Profile
The very first step is to claim your listing on Google. Visit the Google Business Profile page, enter your business details, and follow the verification process. Verification can be done through mail, phone, or email, depending on your business type and location. However, some businesses have had to undergo a new verification process involving video confirmation. Usually, you have to film yourself doing something related to your business to prove it's yours. For example, you might open the front door of your cafe, walk in, and open your register, or go to your office and turn on your computer. Once verified, you have control over your business’s online information.
Filling Out Essential Business Information
Accuracy is key. Make sure your profile includes:
Business Name: Use the official business name to maintain consistency across all platforms.
Address and Contact Details: Double-check your address, phone number, and operating hours.
Website URL: Linking your website, such as your homepage, reinforces your online presence and improves credibility.
Categories: Choose relevant categories that accurately describe your business. This helps Google understand which searches your business should appear in. You can review your competitors' categories to understand which ones are most effective.
Crafting an Engaging Business Description
Your business description enables you to inform potential customers about what you offer and why you’re unique. Incorporate keywords naturally. Don't worry about keywords in this section. Focus more on relevant details that will help explain exactly what your business does and its services. A well-written description should highlight your core services and the value you provide.
Adding High-Quality Photos and Multimedia
Photos and videos significantly enhance your profile. Upload high-resolution images of your storefront, team, and products or services. Regularly update your visuals to keep your profile fresh and engaging. Consider adding a virtual tour if possible—it can make your business more accessible to online users.
Consider exploring our Custom Website Design services for further visual branding and website design assistance.
III. Local SEO Strategies for Increased Visibility
Optimizing your GBP for local SEO is crucial to generating organic visits. Here are some proven strategies:
Importance of Local Keywords and Location-Based Optimization
Focus on local keywords that your potential customers are likely to use. Incorporate terms like “Orlando,” “local,” or your specific neighborhood into your business description and posts. This local emphasis signals to Google that your business is relevant to local searches.
Building Consistent Citations and NAP Across Platforms
NAP stands for Name, Address, and Phone number. Consistency across your GBP, website, and other directories is critical for local SEO. Inaccuracies or discrepancies can confuse search engines and hurt your ranking. Use trusted directories and make sure your details are identical everywhere.
Encouraging and Managing Customer Reviews
Customer reviews are a cornerstone of local SEO. Positive reviews not only build trust but also influence your search ranking. Encourage satisfied customers to leave reviews by following up after a service or purchase. Be proactive in thanking reviewers, and if you receive a negative review, address it professionally and promptly.
For more insights on local reputation management, our Local SEO Orlando service page offers additional tips and strategies.
Responding to Reviews to Boost Engagement and Trust
Responding to positive or negative reviews shows that you value customer feedback. A thoughtful response can transform a mediocre review into an opportunity to showcase excellent customer service. This interaction builds trust with current customers and encourages new ones to engage with your profile.
Content Strategies to Boost Organic Engagement
Your GBP isn’t just a static listing—it’s an active marketing tool. Use content strategically to keep your audience engaged and informed.
Utilizing Google Posts for Updates, Promotions, and Events
Google Posts allows you to share updates directly on your GBP. Use this feature to promote new products, special offers, or upcoming events. Regular posts keep your profile dynamic and signal to Google that your business is active.
Integrating a Blog Strategy to Support GBP Efforts
A strong blog on your website can complement your GBP by providing in-depth information on topics related to your business. For instance, consider writing about tips for local businesses, success stories, or industry trends if you're in the service industry. Each blog post can be an opportunity to drive traffic to your GBP. Make sure to include a call-to-action linking back to your profile or related services on your website.
Visit our Online Marketing page to discover how content strategies can enhance your digital presence.
Leveraging User-Generated Content and Testimonials
User-generated content, such as customer photos and testimonials, can significantly enhance your GBP. Encourage your customers to share their experiences on your profile and social media. Displaying authentic reviews and real-life examples of your work builds credibility and helps potential customers make informed decisions.
Promoting Seasonal or Time-Sensitive Offers
Seasonal promotions are a great way to create urgency and drive traffic. Whether it’s a holiday sale or a limited-time discount, make sure your offers are communicated through your Google Posts and your website. Timely promotions can also be shared via email marketing and social media channels to boost reach.
Off-Profile Tactics to Drive Organic Visits
While optimizing your GBP is essential, integrating off-profile tactics can further enhance your organic reach.
Integrating Your GBP with Your Website for Cohesive Branding
Ensure that your website and GBP are aligned regarding branding and messaging. A cohesive online presence not only reinforces your identity but also helps in building trust. Use clear call-to-actions on your website to guide visitors to your GBP. For example, add a prominent link on your homepage that directs users to your Google Business Profile for the latest updates.
Learn more about aligning your digital presence by exploring our Website Management services.
Using Social Media to Drive Local Engagement
Social media platforms offer another avenue to drive traffic to your GBP. Share your Google Posts on your social channels, invite your followers to leave reviews, and engage with local community groups. Social signals can indirectly influence your local search rankings by increasing online visibility.
Building Backlinks from Reputable Local Directories and Partners
Backlinks from reputable sources are a strong signal for search engines. Submit your business to local directories and industry-specific sites. Additionally, collaborate with local partners or sponsors to secure mentions and links on their sites. This strategy improves your search ranking and increases your credibility in the local market.
Cross-promoting GBP on Various Digital Channels
Don’t rely solely on your website or Google Posts. Utilize email newsletters, blog posts, and even offline marketing materials to promote your GBP. Cross-promoting your profile helps ensure your online and offline audiences know your digital presence.
For more details on integrating these strategies, visit our Online Marketing page.
Advanced Techniques and Tools
Once you have the basics down, you can refine your strategy with advanced techniques.
Using Structured Data and Schema Markup on Your Website
Structured data, or schema markup, helps search engines better understand your website’s content. Adding structured data can improve your website's appearance in search results, which can lead to rich snippets and increased visibility. This is particularly effective for local businesses looking to highlight reviews, operating hours, or special offers.
Leveraging Local SEO Tools and Analytics
To measure the success of your GBP optimization, use local SEO tools and analytics. Google My Business Insights provides valuable data on how customers interact with your profile. Combine this with tools like Google Analytics to track referral traffic from your GBP to your website. This data can help you fine-tune your strategy over time.
If you need assistance setting up analytics or interpreting your data, our Website Management team is here to help.
Monitoring and Adjusting Strategies Based on Performance
Digital marketing isn’t a set-it-and-forget-it strategy. Regularly monitor your GBP's performance and adjust your tactics as needed. Whether tweaking your business description to include trending keywords or updating photos to reflect seasonal changes, continual optimization is key to sustaining organic growth.
Experimenting with Emerging Local Search Trends
The digital landscape is constantly evolving. Stay ahead of the curve by observing emerging trends in local search and user behavior. For instance, voice search is becoming increasingly popular, so consider how your content can be optimized for conversational queries. Additionally, new features on Google Business Profile may roll out occasionally—experimenting with these can give you a competitive edge.
Common Pitfalls and How to Avoid Them
Even the best strategies can falter if certain pitfalls aren’t addressed. Here are some common mistakes and tips to avoid them:
Duplicate Listings and Inconsistent Information
Multiple listings for the same business can confuse both Google and potential customers. Ensure that your GBP is the only active listing and that all your information is consistent with your website and other directories. Use tools or services that audit your citations regularly.
Neglecting Customer Reviews and Feedback
Customer reviews are more than just social proof—they’re a critical component of local SEO. Ignoring reviews or failing to respond can hurt your reputation. Make it a habit to monitor reviews and address any issues promptly.
Overlooking Mobile Optimization
With more users accessing information via mobile devices, it's crucial to ensure that your website and GBP are mobile-friendly. A slow-loading website or a poorly formatted profile can drive potential customers away. Invest in mobile optimization to provide a seamless user experience.
Failing to Update Your Profile Regularly
Your GBP should be a living, dynamic representation of your business. Regularly update your profile with new photos, current promotions, and changes to your services or hours. An outdated profile can lead to missed opportunities and lost trust among your audience.
Generating organic visits for your Google Business Profile requires a multi-faceted approach. By setting up and optimizing your profile, employing local SEO strategies, and integrating content and off-profile tactics, you can significantly enhance your online presence and attract more organic traffic.
Remember, the goal is to create a consistent, engaging, and informative online presence that resonates with your local audience. Regular updates, customer engagement, and a willingness to adapt to new trends are all part of the journey toward online success. Whether a small local business or a larger enterprise, these strategies can help you get noticed in search results and drive more organic visits.
Ready to take your online presence to the next level? Explore our suite of services, including Online Marketing and Local SEO Orlando, to learn how we can help boost your organic traffic and turn visitors into loyal customers. And if you’re looking for a fresh start with your digital strategy, consider contacting us through our Request a Quote page.
FAQs / Additional Tips
Q1: How long does it take to see improvements in organic visits? A: SEO and organic growth are long-term strategies. Typically, you may see initial improvements within 3–6 months. However, significant results can take up to a year or more, depending on competition and the consistency of your efforts.
Q2: What are the best practices for handling negative reviews? A: Always respond promptly and professionally to negative reviews. Acknowledge the customer’s concerns, offer a solution, and invite them to contact you directly. This approach helps resolve issues and demonstrates your commitment to excellent customer service.
Q3: How often should I update my Google Business Profile? A: It’s a good practice to update your profile at least once a month. To keep your profile current, add new photos regularly, update business hours during holidays or special events, and post new updates or promotions.
Q4: Can I integrate my GBP with my website? A: Absolutely. Integrating your GBP with your website ensures consistent branding and messaging. For instance, you can link to your GBP from your homepage or blog posts. This improves user experience and helps drive traffic between your website and your Google Business Profile.
Q5: What tools can help me monitor my profile’s performance? A: Google My Business Insights is a great starting point, providing data on how customers find and interact with your profile. Combine this with Google Analytics to track referral traffic, and consider local SEO tools to monitor your citation consistency and keyword rankings.
Generating organic visits for your Google Business Profile is about creating a holistic and engaging online presence. From meticulous profile optimization and local SEO to leveraging content and off-profile tactics, every effort you put into your digital presence pays dividends over time. By avoiding common pitfalls and continuously monitoring your performance, you can ensure that your GBP remains a powerful tool in attracting and retaining local customers.
If you need further assistance or a comprehensive digital strategy tailored to your business needs, our team at Web Design Services is here to help. Whether it’s enhancing your website, managing online marketing campaigns, or optimizing your local search presence, we have the expertise and experience to guide you through every step.
Remember, a well-maintained Google Business Profile boosts your online visibility and builds trust and credibility among your customers. Start implementing these strategies today, and watch your organic visits grow—leading to increased traffic, more inquiries, and ultimately, tremendous business success.
By optimizing and continually updating your Google Business Profile, you are investing in a resource that can significantly elevate your local search presence. Keep testing new ideas, monitor performance with the right tools, and remain adaptable to the ever-changing digital landscape. As always, if you’re looking for a dedicated partner to help navigate these strategies, our Online Marketing and Local SEO Orlando teams are ready to assist.
Your journey towards generating more organic visits starts with a single step—optimizing your Google Business Profile. Embrace the power of local SEO and content marketing, and turn your digital presence into a vibrant, engaging hub that attracts visitors and converts them into loyal customers.
Ready to get started? Visit our Request a Quote page or contact us directly to learn how we can help transform your digital presence and drive more organic traffic to your business.
For help connecting your Business Profile, website and wider search presence, explore our SEO services.
The Seller’s Bay App is an AI-powered automation platform that streamlines and accelerates the process of optimizing eCommerce product listings. From generating SEO-rich descriptions to crafting internal links and image metadata, this tool automates everything, guided by an SEO specialist with over 27 years of industry experience.
This isn’t just another generic AI tool. It’s custom-built for real store owners who want to rank higher, convert more, and save time — all without hiring writers or spending hours manually rewriting content.
🧠 Why We Built It
After decades of optimizing online stores and manually writing thousands of product descriptions, we knew there had to be a better way. Most AI tools out there are too generic. They don’t understand what a real WooCommerce store needs — clean structure, clear messaging, keyword-rich content, and SEO best practices baked in.
So we built the Seller’s Bay App to do precisely that. It’s fast, intuitive, and powerful — and designed for store owners, not just developers or marketers.
🛠️ Phase 1 Features (Available Now)
Here’s what you can do right now with the Seller’s Bay App:
✅ 1. Generate SEO-Optimized Product Descriptions
Automatically create long-form product descriptions that are keyword-rich, engaging, and structured to convert.
✅ 2. Short Descriptions & Feature Lists
Perfect for WooCommerce's short description field, the app generates concise selling points and bullet lists for skimmers and mobile users.
✅ 3. Image Alt Text and Title Tags
Improve your image SEO and accessibility with auto-generated, relevant alt and title attributes for every product image.
✅ 4. Meta Titles & Descriptions
Ensure your products have optimized meta tags that improve click-through rates from search engines.
✅ 5. Internal Linking
The app will intelligently include an internal link to a relevant product or category page, improving site structure and SEO.
✅ 6. Bulk Product Processing
No need to optimize one product at a time. Process dozens — or hundreds — of products in minutes. Each product takes less than a minute to complete!
⚙️ How It Works
Connect Your WooCommerce Store Securely connect your store using the WooCommerce REST API.
Select Products to Optimize Select the products you want to process (or import them all in bulk).
Let the AI Do the Work Watch as the Seller’s Bay App transforms your product data into fully optimized listings, using AI fine-tuned by an SEO specialist.
Review, Edit, Approve, and Export You have full control — edit anything before it goes live.
💡 What Makes Seller’s Bay App Different?
Seller’s Bay App was developed by an SEO specialist who has actually ranked and sold products online for decades
Built specifically for WooCommerce (Other platforms coming soon)
No fluff — just focused, optimized content
AI trained with real-world SEO experience
Affordable for small shops and scalable for growing stores
Whether you're selling 10 products or 100,000, Seller’s Bay App adapts to your workflow.
💰 Try It Now — Risk-Free for $1
We want you to see real results before committing.
Try it now FREE!
Includes a 3 day free trial
No credit card required
Subscriptions start at only $14.95/month
Premium plan available with enhanced features and faster processing
We’re just getting started. Upcoming features include:
Shopify SEO Automation (Now Available!)
AI SEO Audits
Advanced Bulk Editing Tools
Content Scheduling & Publishing
Agency Dashboard with Multi-Client Support & Analytics
🗣️ Final Thoughts
The Seller’s Bay App was created out of necessity by Robert Long, an SEO specialist with over 27 years of SEO experience, who knows firsthand how exhausting and expensive product optimization can be.
Have questions or feedback? Let us know in the comments — or connect with us on social media for updates, tips, and success stories from our growing community.
If you need hands-on help with your store’s search visibility as well as software, see our WooCommerce SEO Services.
Creating a Google Business Profile is essential for any business looking to increase its visibility online. This profile allows your business to appear in Google Search and Maps, providing potential customers easy access to your opening hours, website, and location. It's also required if you wish to advertise in Google Maps, which I highly recommend if you are targeting local businesses. This step-by-step guide will walk you through setting up your Google Business Profile.
Step 1: Sign in to Google Business
First, go to the Google Business website. If you already have a Google account (such as Gmail), sign in with it. If not, you'll need to create a Google account first. After signing in, you'll be directed to the Google Business setup page.
Step 2: Start the Signup Process
Click the “Manage now” or "Start now" button. Google will prompt you to enter the name of your business. As you type, Google will search for existing businesses with similar names to avoid duplicates. If your company doesn't appear on the list, click “Add your business to Google.”
Step 3: Choose the Category That Fits Your Business
You'll be asked to select a category that best describes your business. This is important because it helps Google match your business with customer searches. Try to choose the most accurate category, as it impacts the features available to your profile.
Step 4: Add Location Details
If you have a physical location customers can visit, choose “Yes” when asked if you want to add a location. Enter your business address. Google Maps will attempt to verify the address. Ensure it's accurate, as this is where Google will send a verification postcard.
If your business does not serve customers at a physical location (e.g., a home-based or online business), you can list your service areas instead.
Step 5: Add Contact Information
Enter your business phone number and website address so customers can reach you. If you don’t have a website, Google offers to create a free essential website based on your profile.
Step 6: Verification
Google must verify that your business is legitimate and that you're its owner. The most common verification method is by mail. Google will send a postcard with a verification code to the address you provided. This can take a few days to arrive.
Sometimes, you might be eligible for other verification methods like phone, email, or instant verification through Google Search Console. Follow the on-screen instructions for whichever verification method applies to you. However, on some occasions, Google will require more extensive verification, such as a video showing you entering your business location and doing something that verifies you own or rent the premises for your business. This could be opening the front door with a key and showing the inside of your business or something similar.
While waiting for your verification code, you can start customizing your profile. Add a detailed description, upload photos, set your business hours, and more. The more complete your profile, the more attractive it will be to potential customers.
Step 8: Enter the GB Verification Code
Once you receive the postcard, log back into your Google Business account and enter the verification code. This will activate your profile, making it visible on Google Maps and Search.
Conclusion
Congratulations! You've successfully created a Google Business Profile. Remember, this is an ongoing process. Keep your profile updated with the latest information, respond to customer reviews, and post updates to engage with your audience. A well-maintained Google Business Profile can significantly enhance your online presence and attract more customers to your business.
Stay active, and make the most of your Google Business Profile to grow your business online. Please read our article on why you need reviews and how to get them.
How To Add A User To Your Google Business Account
Now that your Google Business account is set up and verified, you can add a manager.
Tutorial: How To Add A User To Your Google Business Account
Once you have successfully set up and verified your Google Business Profile, you might need assistance to manage it. Adding a manager or other users to your Google Business account can make these tasks more manageable, whether for updating business information, responding to reviews, or posting updates. This tutorial guides you through adding a user to your Google Business account.
Step 1: Sign In to Google Business
Please navigate to the Google Business website and sign in using the Google account associated with your business profile. This is the account you used to create your business listing.
Step 2: Select Your Business
Once logged in, you'll see the dashboard of your Google Business account. If you manage more than one business, select the business you want to add a user from the list provided.
Step 3: Access the Users Section
In the dashboard, look for the menu on the left side of the screen and find the "Users" option. It may be represented by an icon that resembles two people or labeled as "Users." Click on this to proceed.
Step 4: Invite New Users
With the Users section open, you'll see a list of current users accessing your Google Business account. To add a new user, look for the "Invite new users" icon, typically represented by a plus (+) sign or an "Add user" button. Click on this to add a new user.
Step 5: Enter User Details
A window will pop up asking you to enter the email address of the person you wish to add as a user. This should be their Google account email. After entering the email address, you must select the role you wish to assign to this new user. Google Business offers several roles, including:
Owner: Has full control over the business profile, including adding and removing users.
Manager: Can perform most tasks except for adding or removing users.
Site Manager: Has limited capabilities, mainly around editing and posting content.
Choose the role that best fits the level of access you want the new user to have.
Step 6: Send the Invitation
After selecting the role, click the "Invite" button to send an invitation to the email address you entered. The invited user will receive an email notification with instructions on accepting the invitation and accessing your Google Business account.
Step 7: Confirm the User Has Accepted
Once the user accepts the invitation, their status will change from "Invited" to their assigned role (Owner, Manager, or Site Manager) in your Users list. You may need to refresh the page to see this update.
Conclusion
Adding a user to your Google Business account is a straightforward process that can significantly enhance the management and upkeep of your business listing. By delegating tasks to trusted individuals, you can ensure that your business information remains accurate, up-to-date, and engaging for your customers.
Remember, it's essential to carefully consider the roles and permissions you grant to users to maintain the security and integrity of your business information. With the right team, you can manage your online presence more effectively and grow your business. For help with your business listing and wider search visibility, explore our SEO services.